Thursday 5 December 2013

Video Conferencing for Learning

http://b.vimeocdn.com/ts/
139/436/139436659_640.jpg
Prior to this course, I never really thought about using video conferencing in the classroom, except for distance ed.  I have now learned that both students and teachers can benefit from video conferencing.  Skype, Skype in the Classroom, Google Plus, Adobe Connect,and Elluminate are all great tools for conferencing.  Students can use conferencing to collaborate on group projects together. Also, they can connect on video should they need help with assignments. Students could also arrange peer tutoring via video.  Perhaps an older student could conference with a student in a younger grade to help them with homework.  Also I think that getting teacher help via video may be a neat concept, as often students who need extra help, cannot stay after school. So, teachers could arrange meetings with students who need extra help or review to go over an area of difficulty.  Student learning could also be enhanced by connecting your class with “experts” in certain fields, to learn more information.  For example, if learning about advertising, the class can video conference with someone from an advertising agency to learn more about it.

http://www.securedgenetworks.com/Portals/80068/
images/Vidyo_-_e-Rate_1.jpg
Teacher’s professional development can also be enhanced through video conferencing.  For instance, teachers could Skype with other teaching professionals and specialists to learn from them (and vise versa).  If you have a concern about one of your students and would like to seek out a specialist, you could set up a video meeting.

Video conferencing really expands learning, as the walls of schools are broken down, and learning is no longer confined to just within the classroom.  We can help to foster more well-rounded students by exposing them to the real-world through video-conferencing.

Wednesday 4 December 2013

Reflection on Social Media for Learning and Instruction

Social Media is becoming more and more prominent in the lives of students AND teachers.  Social media tools such as Facebook, Twitter, Pinterest, Edmodo, Google Plus, etc., give students and teachers a mode to share, communicate and reflect on their learning and instruction. Through social media, students are able to share personal bits of information about themselves, by choosing how they wish to express themselves online.  Their social media site can be a reflection of their identity, and peers can get to know them this way. They are also able to share knowledge with friends, peers, and teachers by posting comments.  Students can also share resources like books, websites, newspaper articles, etc.,  that they find particularly informative and useful.  
Social Media also gives students a method to communicate.  Students can communicate to teachers, peers, friends, and others.  Some students may be otherwise too timid to communicate in person, and social media can be their outlet to participate.  Many meaningful discussions can be had on social media, whether it be social issues or topics relevant to the classroom.  Also, students can communicate about assignments, and topics in class that they may need clarification on.  This type of collaboration can create bonds within classrooms.  
Social media can also be used for student reflection.  Sites like Facebook and Twitter allow for personal status updates and tweets that are limited to a certain number of words where students can post their reflections.  Reflection practices can be promoted by teachers as they encourage students to make posts on how they are feeling, what they learned, and what they need clarification on.

Through these social media sites, teachers are able to share resources, articles, thoughts, and ideas.  I have really learned this from our Tech class.  Twitter is an example of a social media site that is great for sharing.  By ‘following’ teaching professionals, and educational figures, I am able to gather knowledge and resources from these sources.  For instance, I am gathering great information from ‘@edutopia’ through Twitter.  
Communication is another benefit to teachers using social media.  Teachers can communicate with other teachers, parents, and students.  Meaningful discussions can be had and information can be shared.  Twitter, Facebook, and Edmodo can be particularly useful to communicate with students and parents. Teachers can communicate about assignments, important dates and deadlines, provide clarification, etc.  This method of communication makes it easy for everyone, and opens the door to creating a collective classroom community. Teachers can use social media to spark communication among peers and can facilitate discussions regarding certain topics relevant to what is being learned in class.  In this situation, social media can give students a voice.  Giving students an outlet to share this voice is particularly important for those who have trouble expressing themselves in the classroom and at school.  This YouTube video really addresses this point.


I think that using social media to reflect may be a personally challenging task, yet a beneficial one. Teachers can reflect on whether they think a lesson went well, or not. They can use this reflection to ask other teachers for tips and suggestions.

Personally, it feels good to share ideas and resources that you think others will find useful. I particularly find having resources and ideas shared to me through social media, a great source, as I trust the information that fellow teachers are sharing with me.  I think that Tech class was a perfect example of sharing through social media. Classmates were constantly posting (onto Google Plus, Twitter, Blogs, and the Forum) resources, and sharing cool ideas that they either heard about or tried in their classroom.  Delicious was also a good tool to share links.  As well, our blogs offered us an outlet to share thoughts and ideas on particular tech tools and teaching ideas. I have learned so much from this course and from my fellow classmates!
Also, through this course, I have learned that through social media, I am able to communicate with other teaching professionals who without social media I would have never been able to communicate and share ideas with.  
I have found that from being exposed to so many different ideas and resources surrounding education over the past view months, that my own teaching practices are constantly in review.  This self-reflection is the way to become a better, more informed teacher.    


Tuesday 3 December 2013

Presentation Software - Benefits and Pitfalls

There are many benefits to using presentation software in the classroom.  Teachers can use presentations to teach creative lessons that include audio, videos, images, and text, thus reaching the multiple intelligences of the students in the classroom.  Also, these features are often appealing to students, therefore, keeping them engaged.  There are many presentation software programs that have fun and creative layouts, where teachers can present information to their students.
The benefits of students using presentation software in the classroom, is that they can organize topics that they have learned in a way that makes sense to them. I think that Prezi is a great choice for students as there are many different layouts to choose from - and students can pick which layout will best tell their story. 
The collaboration component of some of these presentation software tools like Prezi, and Google Drive Presentation are beneficial to both teachers and students. Teachers can work on presentations together with other colleagues and with students. Students can work on presentations with their peers and can receive guidance and feedback from the teacher throughout. 
The only pitfall I can see to using presentation software in the classroom, is over-reliance on presentations.  I think that presentations are an excellent source, but that it is important that we still keep the ‘human touch’ to teaching.  Learning from teachers and peers in the classroom still has many benefits, including teacher-student relationship building and interactions. We can learn a lot from one another even without saying anything. With that said, presentations are great to use in conjunction with teaching.

Monday 2 December 2013

Presentation Tools Review

1) Prezi:

Prezi is a free online presentation software. You have the option to pay if you’d like to get the Prezi Pro version. One of the benefits of the Prezi Pro version is that you can keep your presentations private.  I will continue to use the free version as it works well, and is free.  Having a free version is positive for schools as well.
http://cdn3.tnwcdn.com/wp-content/blogs.dir/1/files/2012/10/
prezi_template_screenshot.png
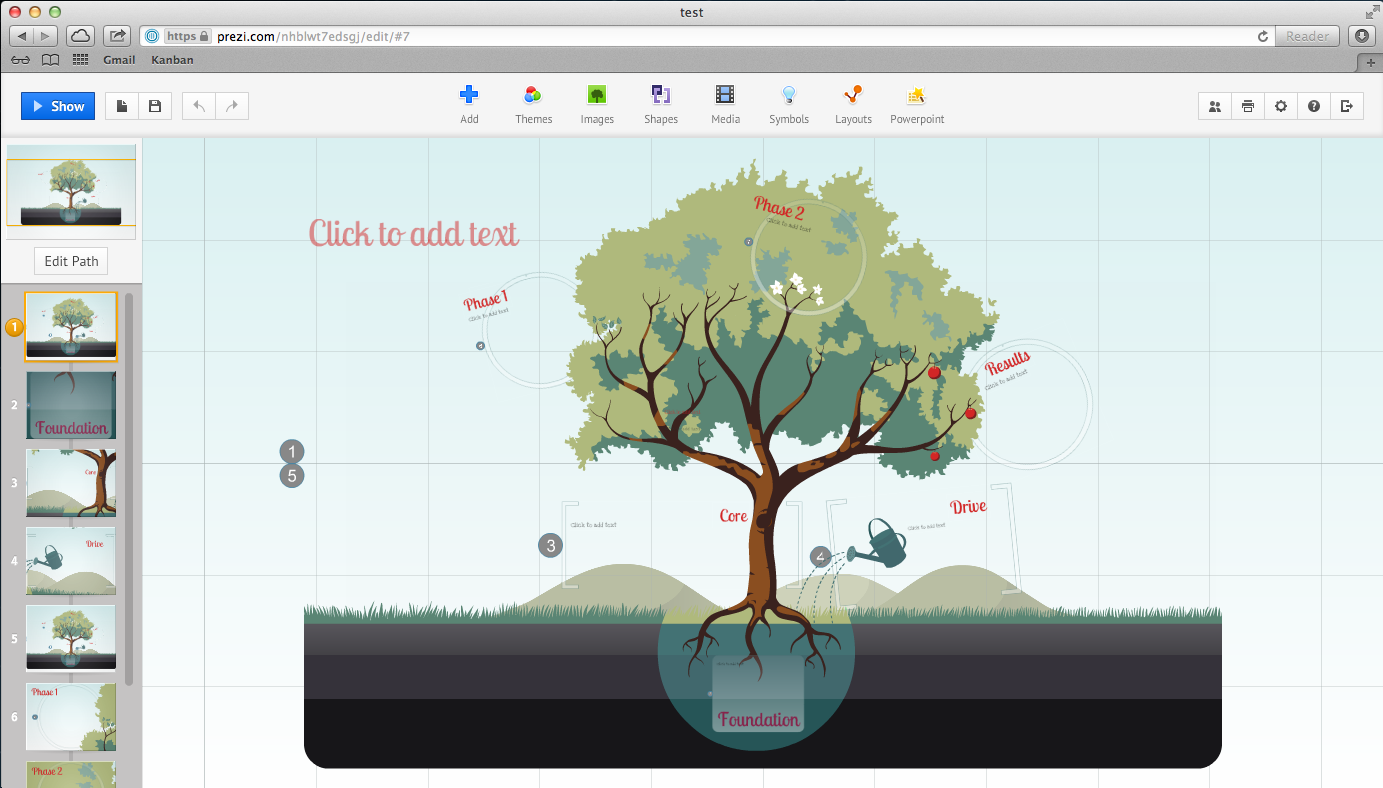
Prezis are easy to create. You simply click the create button, and then choose a template to use.  With each template you can incorporate images, videos, audio, and text.  You can then use the transformation tool to make changes to the presentation, like resizing, and rotating objects on the document. You can rearrange the order by dragging the icons to manipulate the order in which your story will unfold.  
Prezi allows you to share your presentation and to collaborate with others. To share, you can copy your url, choose a co-editing option, or embed your Prezi on your blog. You can also download your Prezi to your desktop.  Another neat feature about Prezi, is that you can present your Prezi in real-time by inviting people to view the Prezi. Their pitch for this was that it can save down on travel, which I thought was pretty cool!
My favourite part about Prezi is the zooming. I really like that you can keep the overview visible for the viewers throughout the presentation.  This helps the viewer see where the presentation is going, and can help see the whole picture. I like that there is an obvious structure with Prezi and how all of your information relates to the overall story.  


Powerpoint presentation software must be purchased through Microsoft Office.  Microsoft Office is quite expensive. However, from my experience, most school computers are equipped with Microsoft Office, including Powerpoint.  Since Powerpoint is very commonly used and it seems to be the ‘go to’, many have experience with it, making the process of creating a presentation familiar.  
http://www.filewin.com/cdn/images/img-filewin
--2-Microsoft-PowerPoint.jpg
Powerpoint provides the user with templates to choose from, which helps to organize the presentation.  Unlike Prezi, Powerpoint organizes it’s slides in a sequential, linear order, going from one to the next, without having the overview or the overall picture shown to the audience like Prezi does.
Powerpoint provides the user with many formatting options to choose from. There are many different fonts, colours, backgrounds to choose from.  You can add in transitions from slide to slide, and there are even animations to choose from as well to help the user with explaining their presentation.
Links, video, sounds, and images can all be inserted into powerpoint.  I do however, find the process of creating links, sounds and video a little more difficult than with other presentation software.
Since Powerpoint is most commonly used, it is a good tool to use to show students how to use since they will likely come into contact with it throughout their school years.


http://www.openoffice.org/trademark/logo_color.png
Open Office is a free presentation software that is easily downloaded to your computer.  Since Open Office is downloaded to a computer, you do not need to rely on the internet to access your presentation. With that said, it’s access is limited, as you can only use a computer with it downloaded on to access your presentation.  I can see this being an issue in schools, as students are often working on many different computers. Teachers would have to see if they can download Open Office to the school computers, and would have to make sure that students download this program onto their computers at home.
Very similar to Powerpoint, Open Office Presentation offers many templates, and backgrounds to choose from.  
You can insert audio and video files by uploading them from your computer.  Or, you can insert the link to the audio or video file by providing the hyperlink. You can also insert images from your computer.


        Google Presentation is a free presentation software linked to your Google account.  You can access your presentation from any computer that has internet access - you do not need to download anything to your computer.  You can find Google Presentation in your Google Drive. I particularly find this presentation tool handy, as I use Google Drive quite regularly. I like the convenience of having my documents, presentations, email, Google Plus, and blog all through one account. 
http://www.itcentralpoint.com/wp-content/
uploads/2012/10/GoogleDrive.jpg
Google Presentation has some basic themes, and backgrounds that you can choose from.  You can also perform basic functions, like transitions, and animations. 
Google Presentation is a lot like Powerpoint in terms of it’s layout. It’s slide set-up is linear, as it goes from one slide to the next.  I do find however, that Google Presentation has less options to manipulate your presentation to make it your own than does Powerpoint or Prezi. 
You can insert audio files from audio tools that provide a link, like SoundCloud, or Audioboo. Videos through YouTube are also easily inserted as there is a button to insert YouTube videos.  Images are also easily inserted as you can search for images on the web, insert images that are saved to your google account, or from your computer.  
Another great aspect of Google Presentation is that you can collaborate on presentations. You can provide access to other users to edit the presentation, thus creating a collective project/presentation. This component can be particularly useful for students working in group projects, or even for peer-editing.
I think that Google Presentation is a good choice for teachers to use with students who are creating basic presentations. I think that Google Presentation is a good tool to teach students the basics of creating presentations - which is becoming more and more a critical skill.

Prezi Presentation - Tech Tools

I made a Prezi on important topics that I learned in Tech9F61. This Prezi provides me with a summary of tools that we have been exposed to throughout the course. With each tool, I provided a few ideas of how I see myself using it in my future classroom. This presentation will be very useful to me, as it will be a “go-to” document to remember the key tools that I learned in this course.

Tuesday 19 November 2013

Easy to Use Image Editing Tools

I have come to realize that image editing tools are much more user-friendly than I recall! I had some fun experimenting with different image manipulation tools, and here are a few that I found to be particularly great for multiple reasons.
http://picasa.google.com/


1) Picasa is a free online image editing tool from Google. Picasa is very easy to download, and works on every operating system. I found this to be a bonus, as some of the other software I investigated could only run on either Windows or Macs, not both, like Picasa. Upon download, Picasa uploads all of the pictures from your computer. Picasa’s purpose is to edit and touch up photos. Since an abundance of pictures can be uploaded to Picasa, a nice tool that it offers it to edit a ‘batch’ of pictures, in which you can edit or add effects to a whole group of pictures at once. You can also make slideshows, and Web Albums, that make pictures easy for sharing.  There are also multiple editing effects to choose from like straighten, red eye fix, sharpen, black and white, comic book, pixelate and more. Additionally, because Picasa is associated with Google, it makes photos very easy to share on Google Plus. One feature of Picasa that caught my eye, was side-by-side editing, in which you can compare the original photo to your edited one side-by-side.  Overall, Picasa is an easy to use basic image editing software, that is best suited for teachers and students who are performing basic editing on large sets of image files.


http://fotoflexer.com/

2) Fotoflexer is an image editing software that does not need to be downloaded to your computer. You can simply upload a photo that you wish to edit right from the FotoFlexer website. This is a convenient feature as you can use FotoFlexer on any computer with internet access. Photos are uploaded from your computer, from social networking sites (Facebook, Photobucket, Picasa, etc.), or you can even upload a picture from the web by entering the URL.  FotoFlexer’s tools are well laid out for the users in tabs.  Some of the basic functions include: auto fix, fix red eye, crop, and more. There is an effects tab, in which you can have the choice to add various effects to the photo, including, colour splash, blurred edges, comic, neon, grey-scale, and more. FotoFlexer also has the option to decorate your photo with text, stickers, borders, and other fun decorations. Another neat feature of FotoFlexer is that you can add layers to your picture. I like that with all of the effects and tools, you can click on them, and they are applied to the image so you can see if you like it, but you can just as easily click cancel and the image will set back to it’s original. This gives the user the flexibility to ‘play around’ with the tools available to them. When saving the photo you can save it to your computer, or the user can save it to a social media connected to FotoFlexer.  


Below is a picture I edited while experimenting with FotoFlexer:


Sunday 10 November 2013

5 Audio Activities to Use in Your Classroom


Here are 5 practical uses of audio tech tools that you can use in your classroom!

1. Reader’s Theatre: Students can create great Reader’s Theatre audio files.  Reader’s Theatre can be done either using a basic audio tool like Podomatic or Audioboo, or using a more complex audio tool like Audacity, where students can edit their audio tracks, can add sound clips and create multi level tracks.  The teacher can create a model reading blurb first reading something with no expression and then reading the same script with a lot of expression.  Students can practice their scripts on their own first, just to get a hang of using audio technology tools.  When ready, they can record their performance with their groups.  Students can then upload their performances to the class blog, where their peers can listen to their performances.  Reader’s theatre using audio recording tools is a fun way for students to practice reading out loud, build fluency, and practice expressive reading.  It also  integrates reading with writing, it is engaging, and it fosters cooperative learning.  From my experience with using Reader’s Theatre in class, students tend to really enjoy it!

2. Advertisment: Students can create an advertising audio podcast, promoting people to travel to a certain place of study. Students will have to research this country or city, and it’s main attractions.  Students can create a brochure of their place, and can also create a podcast.  Creating a podcast will be fun for the students, and will also give students a chance to explain, using words, what they studied about that place.  Using a podcast to advertise for a certain place, will give students the opportunity to practice fluency, tone, and expression.

3. Formative Assessment: Teachers can use audio recordings to ask students about particular topics that they are learning about in class. Just as a simple exit slip or a review about whether students understand their topic. Teachers can ask students a particular question, for example: “What happened on Jacques Cartier’s first voyage to North America”, and students will create a quick podcast answering the question.  Students can then copy and paste the link into the classroom blog, or on the classroom ‘delicious’ bundle, or on the classroom twitter account, and then the teacher can review the podcasts to ensure student understanding of the particular topic in question.

4. Book reviews using audio recordings. Just like a book report, teachers can ask students to record a review on a book they have just finished reading as a class or individual book reports.  Students can discuss the characters, plot, setting, problems, and solutions of the book.  Students can then review whether or not they enjoyed the book, and whether they would recommend it to others. This activity can be extended by providing the students with a certain scenario, and discussing how this scenario would be solved from the perspective of one of the characters in the book.

5. Google Presentation or Powerpoint Presentations.  Students and teachers can add audio files to their google drive presentations and to their powerpoint presentations.  Whether the presentation be on the Solar System, on the human body, or the Government of Canada, etc., students can add audio files explaining their projects.  Some students have trouble speaking out loud to their classmates, so it could be a good option for them to pre-record their comments about their project.  This can be accomplished by creating an audio file using an Audio technology program that has easy sharing privileges, like SoundCloud or Podomatic.  Once the audio file is created for each slide, teachers and students can copy and paste the link into the notes section of the slide.  
Source: Caitlin Tucker's Blog
Also with Google Drive voice comments, teachers can leave voice comments on student’s work.  You can connect a voice comments app to your google drive, (the one I use is Kaizena), and when you open a students document, you click ‘open with’  Kaizena. You can then highlight sections that you wish to add a comment, and then click record. I think that this can be a very useful tool for teachers and students. For teachers, it is much faster to record their voice, than to write out every comment.  For students, hearing voice comments can be more effective, because too often enough, when receiving a project back, students tend to just look at the grade, and do not focus on the comments. I also believe that voice comments on text documents, is a much more personal way for students to receive feedback, and I believe that students will respond better to voice comments than to written comments. 

Source: Caitlin Tucker's Blog
I recommend checking out Caitlin Tucker's blog for step by step instructions on how to use voice comments.